What perspective taking means in spatial questions
Spatial perspective taking means imagining what a fixed object looks like from a different observation point. The object keeps the same structure; the viewer changes position. A question may ask for a front, side, or top view, or for the direction to a landmark after you change where you stand. The challenge is choosing a consistent reference frame instead of treating “left” and “right” as permanent labels attached to the object.
Many block questions use orthographic views rather than a realistic camera. In an orthographic front view, depth collapses: stacks at different depths can project into the same column. Heights remain meaningful, and a taller rear stack may extend above a shorter front one. In a top view, height collapses instead: each occupied vertical column becomes one footprint square. Read which kind of view is requested before comparing silhouettes.
A four-step viewpoint check
- Fix the viewing direction. Locate the front arrow or named observation point before reading left and right.
- Track one landmark. Choose a tall stack, unusual gap, or marked face that stays identifiable.
- Collapse the viewing depth. For an orthographic view, combine stacks that lie on the same line of sight.
- Check a second feature. Confirm the tallest column and one visible gap or edge in the proposed view.
For block stacks, a height plan is a useful intermediate representation. Write the number of cubes in each vertical column on a ground grid. State that the columns are solid from the ground if you want the plan to determine the total cube count. The plan removes ambiguity about hidden blocks and makes front, side, and top projections easier to compare. A drawing alone may hide a gap or a floating block that changes the answer.
A reference arrow must stay fixed while you build the view. If you mentally stand behind the object, your left-to-right order can reverse relative to the original front view. Re-establish your viewing direction rather than reflecting a candidate just because it looks close. As in mental rotation, one landmark is useful but two checks are safer: a gap and a tall column often distinguish otherwise similar profiles.
Worked example: a front silhouette
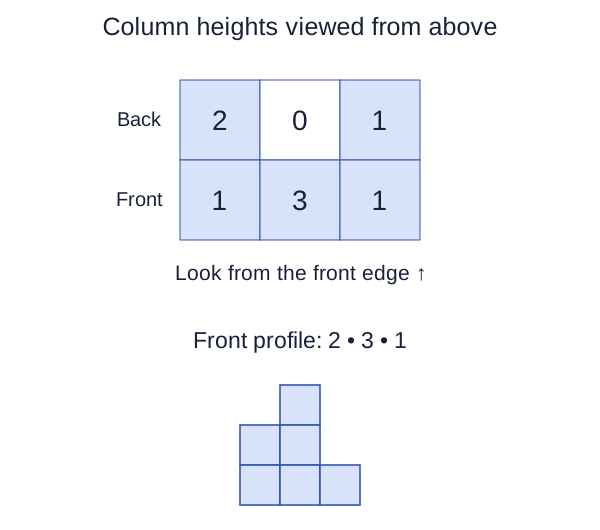
Look along the depth of each column
The back row is 2, 0, 1 cubes tall, and the front row is 1, 3, 1. From the marked front edge, the left profile reaches max(2,1)=2; the centre reaches max(0,3)=3; the right reaches max(1,1)=1. The answer is a 2–3–1 silhouette.
Choosing the front row alone would give 1–3–1 and miss the rear cube that remains visible above the left front stack. Adding the two heights would give 3–3–2, but a silhouette records the highest visible extent, not a sum of layers along the line of sight. Taking the maximum is the correct operation under the stated orthographic-view and solid-stack conditions.
The top view answers a different question. It has five occupied ground positions because exactly five entries in the plan are greater than zero. The rear centre is empty; the other five positions contain at least one cube. Neither the front silhouette nor the top footprint alone gives the full number of cubes. The height plan supplies the missing depth-and-height information needed to count them without guessing.
Block counting: count solid columns, not visible faces
A block counting test can show a stack of unit cubes with some cubes hidden. If all vertical columns are filled from the ground and their heights are provided, add those heights once each. For our plan, the total is (2+0+1)+(1+3+1)=8 cubes. Counting top squares gives five, and counting visible faces gives a different number again. Faces, occupied positions, and complete cubes are three different quantities.
If a problem gives only an external drawing, look for statements about solid stacks, support, missing cubes, or hidden spaces. Those conditions determine whether a unique total can be recovered. A silhouette does not by itself prove that everything behind it is filled. The responsible answer to an under-specified drawing may be a range or a request for the missing condition, rather than a confident exact count.
To review a counting mistake, mark each ground position and write its column height. Then sum by rows or by layers and compare. In the example, the lowest layer has five cubes, the second layer has two, and the third layer has one: 5+2+1=8. Agreement between the column and layer methods is a useful independent check. It also shows why the five-square top footprint is only the lowest-layer count in this particular solid stack.
Moving the viewer versus turning the object
Turning an object while holding the viewer still and moving around a fixed object can produce related pictures, but the instructions describe different reference frames. In a rotation task, track the object’s own features through a turn. In a perspective task, track the observer’s location and viewing direction. If a question includes compass directions or named landmarks, that distinction affects which side of the observer a landmark ends up on.
For a labeled cube, the opposite pairs remain fixed whichever reference frame changes. A and E do not stop being opposite when you walk around the cube. However, the face currently appearing on the left of your screen may change. Practice the cube net folding tool to separate fixed face relationships from temporary screen positions. Then ask which faces a particular viewpoint can actually reveal.
A perspective drawing also introduces foreshortening: parallel edges may look shorter or converge in the image. An orthographic-view question usually asks you to ignore that camera effect and compare the exact footprint or profile. Do not mix the two projection conventions halfway through a solution. Use the convention stated by the item, and pay attention to a diagram’s arrows and labels rather than judging distance from how large a feature looks.
A practical viewpoint routine
Build a small stack with blocks or draw a height plan. Predict its front view, top view, and right-side view before changing where you look. For every prediction, state which dimension disappears and which feature anchors the view. Include a rear stack that rises above a shorter front stack: this exposes the common mistake of using only the nearest row. Keep the first examples untimed so you can explain each visible and hidden part.
After a mistake, identify whether you reversed left and right, ignored a rear stack, confused the footprint with the cube count, or assumed unsupported hidden blocks. Retry with a new arrangement that tests that same issue. For broader practice, use the free spatial reasoning test, which combines viewpoints with rotations, folding, and a cross-section question. For reflection and layer tracking, continue with the paper folding guide. A short practice score is feedback on these examples, not a judgment about a person’s overall ability.
Take the method into daily practice.
Foldmetry on iPhone and iPad brings six spatial skills into 36 guided lessons, daily practice, and local mistake review. Free to start, with optional Pro features.
Download on the App Store